Building a Github Blog with Jekyll and Ruby
In this three-part tutorial I’ll walk you through how to build a Github blog from scratch with Jekyll and Ruby. While most of this is pretty straight forward, there were a few things I encountered that were a bit tricky to understand and/or implement.
Note: I’m setting this up on OS X so a few of the commands are system specific.
Part 0 - Prerequisites
Part 1 - Setting up the Blog
Part 2 - Changing Themes
Part 3 - Enabling Comments
Prerequisites
Install RVM and Ruby
RVM: Ruby Version manager lets you switch between Ruby versions without changing the system version. Install them both with:
$ \curl -sSL https://get.rvm.io | bash -s stable --ruby
Before we can use RVM we ned to load its funtions with:
$ source /Users/<username>/.rvm/scripts/rvm
Install Jekyll and Bundler Gems
Jekyll is the backbone of this tutorial. It’s a blog-aware, static site generator that handles the painful task of editing HTML and CSS files. We Can just give it a markdown file and it will give us a fully formatted blog post. Bundler provides version consistency for Jekyll projects by tracking and installing the exact gems that are needed for you system and setup.
They can be installed simultaneously with:
$ gem install jekyll bundler
Note: This tutorial assumes that you have git set up on your system. If you do not already have it see Setting Up Git.
Setting up the Blog
Local Setup
Personally, I prefer to have a local development environment to test everything and make sure the formatting and functionality acts as expected before making it live. Luckily, Jekyll makes this extremely easy.
Since we are building a blog on Github, we’ll need to use the default Github-pages
domain name format, <username>.github.io. To start a new Jekyll project, simply
type:
$ jekyll new <username>.github.io
$ cd <username>.github.io
If everything went well, we can see the template site locally by typing:
$ bundle exec jekyll serve
Then, in a browser, navigate to localhost:4000 and you will see something like
this:
Changes made to any of the files in the project folder will be automatically updated (except for _config.yml) so you can just refresh the page in the browser and your changes will be there.
Personalizing the Basics
To add your personal information, blog title, url, etc., open the file _config.yml and replace the existing information there. You will have to restart the server after making changes to _config.yml.
Getting the Blog on Github
To make this blog live, we will first need to create the repository on
Github. Click Create Repository and name the repo
<username>.github.com. You can add a description if you want but don’t
initialize with a README.md just yet. After you click Create Repository,
follow the instructions to create a new repository on the command line:
$ echo "# <username>.github.io" >> README.md
#this creates the readme file and adds the project name as the only line
$ git init
$ git add README.md
#this will add all the files to the git repo
$ git commit -m "first commit"
$ git remote add origin https://github.com/<username>/<username>.github.io.git
$ git push -u origin master
If that worked, add the rest of the files to the github repo:
$ git add .
$ git commit -m "adding blog files"
$ git push
After a few seconds, the site should be live at https://<username>.github.io.
You will see the same Jekyll template as we saw earlier (unless you changed
some fields in _config.yml).
Congratulations, you now have a fully operational blog. To make your first post,
simply edit the lone markdown file in the folder _posts or add another
markdown file with the title YYYY-MM-DD-name-of-post.markdown. You will
need to add the yaml front matter at the top:
---
layout: post
title:  "First Post"
date:   2017-10-01 05:49:27 -0500
categories: github blog jekyll
---
Then, add some markdown to the file, save it, serve the site with bundle exec
jekyll serve, and navigate to localhost:4000. If you are satisfied with the
changed, push the changes to your github repo (add, commit, push).
Changing Themes
So far, so good. We’ve created a blog template which we can develop locally and deploy on github with just a few lines of code. Now, let’s change the theme so our blog stands out from every other blog made with the default template.
This process is a bit tricky in the way that bundler and jekyll store and use
the theme files. For instance, you will notice that there are currently no files
in our blog repo that deal with how each one of our pages is formatted (These
files would normally live in the _layouts folder). Also there’s no css
stylesheet. This is because some of the site’s files are stored in the theme’s
gem and are hidden from our view. To override the defaults for any theme, we
just need to have the similarly named file(s) that we want to override in our
local repository. This is because Jekyll looks for the necessary files in your
site’s folder first, and then looks for the files in the theme’s gem. We’ll
see this in action shortly.
When we created the jekyll template, the minima theme was used by default. To see where the rest of the files associated with the minima theme are stored, use:
$ bundle show minima
#show the path to minima theme
Some other helpful commands that might be useful for this process:
$ ls $(bundle show minima)
#list the contents of the minima theme folder
$ cd $(bundle show minima)
#change directory to the minima folder
$ open $(bundle show minima)
#open the minima theme folder in a Finder window
I’m going to be using jekyll-theme-slate
for my blog, but the process described here should work for other themes as
well. First we need to edit the Gemfile to make sure that we have the theme’s
gem installed.
Edit Gemfile in your favorite editor:
- comment out the line
gem "jekyll", "~>3.6.0"- version numbers will likely differ
- comment out the line
gem "minima", "~> 2.0" - add this line
gem "jekyll-theme-slate" - uncomment the line
# gem "github-pages", group: :jekyll_plugins - comment out the last line if not on windows
- It’s just there becuase windows doesn’t handle time zone info very well
Now let’s install the theme’s gem. Run the following:
$ bundle update
$ bundle install
Next we need to tell Jekyll which theme to use. Do this by editing the _config.yml
file and changing the theme from minima to jekyll-theme-slate. Here’s where
I got confused the first time through. If you serve the site now with bundle
exec jekyll serve you will get three build warnings saying that layouts for
post, page, and home do not exist. The reason for this, as mentioned earlier,
is that Jekyll is looking locally first and then in the theme’s gem for files
it needs. But jekyll-theme-slate has no layouts for post, page, and home!
If you look at the top of the file about.md you will see the yaml front matter
that looks like this:
---
layout: page
title: About
permalink: /about/
---
The line layout: page is where the layout for this particular page is set.
Before the theme was changed, it found this file in minima’s gem. Now, since
it’s looking in jekyll-theme-slate’s gem, it’s not there.
So what we need to do is copy the page, post, and home layout files from the
minima theme’s gem to our local repository. First, make a folder called _layouts
in the top directory of your site:
$ mkdir _layouts
Next, copy the contents of minima’s _layouts folder to your newly created folder:
$ cp $(bundle show minima)/_layouts/* _layouts/
Finally, since we want to use the default template from the jekyll-theme-slate
gem, remove the defualt.html file:
$ rm _layouts/default.html
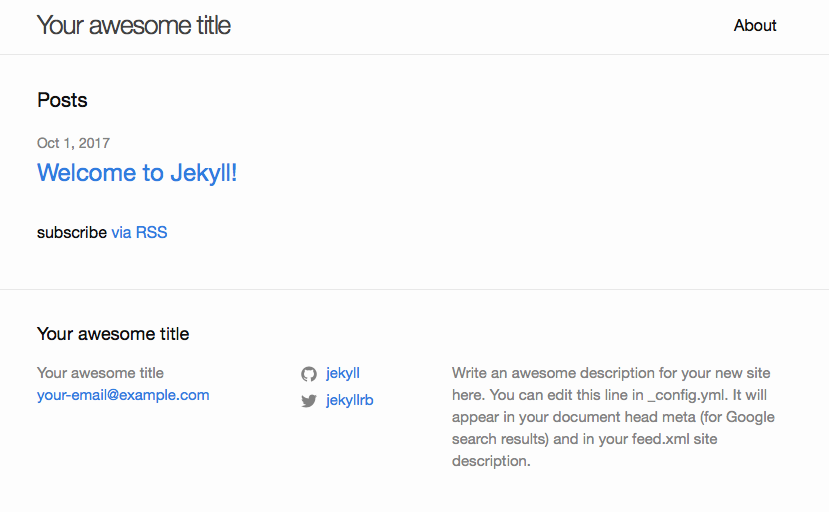
Now if you serve the site with bundle exec jekyll serve you will see a very
good looking blog homepage like this:

Enabling Comments
Because Jekyll sites do not come with a database, there is no way to enable comments without using a third-party service. In this part of the tutorial, we will use Disqus to enable comments on our blog posts. It’s fairly simple:
- Sign up and register your site with Disqus.
- This will give you a short name which we will use in a moment
- Make a new directory called _includes
$ mkdir _includes -
Create a file in the _includes folder called
disqus_comments.htmland add the following:{% if page.comments %} <div id="disqus_thread"></div> <script> var disqus_config = function () { this.page.url = "http://<username>.github.io{{ page.url }}"; // <--- use canonical URL this.page.identifier = "{{ page.id }}"; }; (function() { // DON'T EDIT BELOW THIS LINE var d = document, s = d.createElement('script'); s.src = '//{{ site.disqus.shortname }}.disqus.com/embed.js'; // <--- use Disqus shortname s.setAttribute('data-timestamp', +new Date()); (d.head || d.body).appendChild(s); })(); </script> <noscript>Please enable JavaScript to view the <a href="https://disqus.com/?ref_noscript" rel="nofollow">comments powered by Disqus.</a></noscript> {% endif %} -
Change
<username>to match your github username - Edit
_config.ymland add the following lines:disqus: shortname: <shortname> - Confirm that you have the following at the end of
_layouts/post.html:{% if site.disqus.shortname %} {% include disqus_comments.html %} {% endif %} - Add
comments: trueto the front matter of posts you wish to include comments on, like this:--- layout: post comments: true title: "Welcome to Jekyll!" date: 2017-10-02 05:28:42 -0500 categories: jekyll update ---
That’s it, now if you serve your site you should see the comments section on any post that you added thecomments: truetag to:

Conclusions
So we’ve managed to build a free, fully functional blog page from scratch using Jekyll and Ruby. We were able to change the theme by mixing and matching the necessary files from the mimina and jekyll-theme-slate themes. Also, we enabled comments on our blog posts using Disqus. Not bad (for a first post)!
Don’t forget to add, commit, and push your files to github so that the site will be available over the internet for the world to see! If you have any questions feel free to leave a comment. Cheers!
~Taylor